Widgets are small applications that add aesthetic appeal to your home screen while also displaying data at a glance and providing useful features. In this article, we will help you create widgets for Android and iOS and integrate them into a React Native application.
Why should you develop a widget?
Most widgets are developed not only so users can stay up to date with relevant information and use their applications from their home screen, but also because they help those apps stand out among competitors and retain user engagement.
Unfortunately, widget development is not feasible using React Native alone. An alternative is to get a native widget to communicate with your React Native application, and that is what we are going to do in this guide.
Widgets with React Native
First of all, you’ll need to create your React Native app. This will be a bare React Native app; it does not use Expo. The command you will be using to set it up is
npx react-native init widgetAsap
In our case, the project has been created with react-native version 0.64.2.
Then, you will need just one additional dependency that will be creating the bridge between the widget and the app. This will be different for iOS and Android as we’ll show you below.
Let’s start with iOS. Behind the scenes, the package is just taking data from the React Native app and putting it into UserDefaults for Swift. According to the official docs, UserDefaults is a persistent key-value storage.
Install the dependency by running the following command on your terminal:
yarn add react-native-shared-group-preferences
Let’s import it and try it out. To keep it simple, the application will just ask for a text value to be rendered into the widget. The content of the App.js file will be the following:
Link: script
As you can see, SharedGroupPreferences is being imported from the library. The way to use it is to store an item using setItem with the given key, value and group. In this example, the key will be widgetKey, the value will be widgetData—a JavaScript object that will contain the user input—and, finally, group will be the name of the group that will share the information between the app and the widget. We will see them again when working on the Swift code.
On the other hand, for Android, we’ll use SharedStorage. This is imported fromNativeModules, which belongs to the React Native package so we don’t need to install any additional libraries. In this case, the stored value is a serialized JavaScript object that has been converted to a string and saved using the set SharedStorage method.
That’s all you need to know about the React Native application. Now it’s time to look at some native code. Let’s start with iOS.
iOS widgets
If you are new to iOS widgets, we recommend you take a look at the official Apple documentation. To develop one, you will need Xcode version 12 or above so it can run iOS14 and have access to WidgetKit. This is a framework that allows you to build widgets easily and make them compatible across the different Apple operating systems. In this case, we will be using version 12.4 of Xcode. You will also need an Apple Developer account.
The first step will be to create the widget extension for the app. Open the application you have just created in Xcode, go to File > New > Target and select Widget Extension. Choose your widget name and a folder will be created.
Now it’s time to set up your App Group. This will enable your React Native application to communicate with the widget extension. Go to the file with the “.xcodeproj” extension.
Select the Build Settings tab and search for Library Search Paths. Look at the value and replace swift-5.0 with swift-5.2. This will prevent you from getting an Xcode error later on.


Also, right-click on widgetApp in the Project Navigator on the left and click “New File…”. Create an empty Swift file in the project and, when Xcode prompts you, press Create Bridging Header. This file won’t be used later, it’s just to avoid getting an Xcode error.

Then, select your project file and look at the targets; you should be seeing something like this:

You will need to add the widgetAsap and MyWidgetExtension targets so they become part of the App Group we just created. Select widgetAsap and, inside the Signing & Capabilities section, click on in the upper right. Select App Groups and type a name of your choice. We will be using group.asap. Repeat this step with MyWidgetExtension.
We are almost there. You now need to modify the MyWidget.swift file. There, you have to retrieve the data that is being stored by your React Native code. Remember you are using UserDefaults for this. Take a look at what the content of the file will be, as explained below.
Link: script
We will delve just into what is important so you can create your widget as quickly as possible.
First of all, take a look at the WidgetData struct. Its type is Decodable because it is the retrieved data we will parse and display on the widget. In this example, it contains only a text property.
Then, we have the SimpleEntry struct. It has the TimelineEntry type, which specifies the date to display a widget (used to refresh the widget content) and can also include the information to display. In this case, we added a text value to match the one we are storing in the UserDefaults.
Now everytime that SimpleEntry is instantiated, it has our text string. This occurs in MyWidget_Previews, placeholder, getSnapshot and, the vital one, getTimeline. This function is the one that does the work here, so we will explain it step by step below.
It starts by initializing UserDefaults using the App Group we created:
let userDefaults = UserDefaults.init(suiteName: "group.asap")
Then, it retrieves the value from the widgetKey we defined in the React Native code:
let savedData = userDefaults!.value(forKey: "widgetKey")
After that, it decodes the data received and defines how often our widget will refresh:
let parsedData = try? decoder.decode(WidgetData.self, from: data!)
let nextRefresh = Calendar.current.date(byAdding: .minute, value: 5, to: entryDate)!
In this case, it will be five minutes, the lowest value available.
With that information, it creates a SimpleEntry and passes it to set the Timeline. This will provide the widget’s new content and indicate when to carry out the update.
The last step is to style the widget. This is up to you. In this case, we decided to keep it simple. The MyWidgetEntryView struct is the one that takes care of styling.
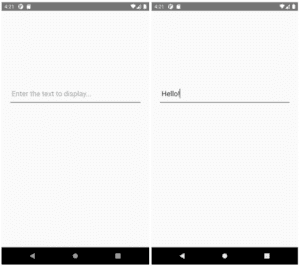
You can test your widget by running your application using npm start and using a virtual or real device. Once the application has been installed, select the widget from the widget list and place it on the home screen.
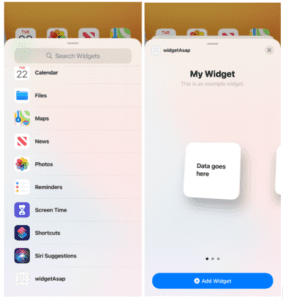
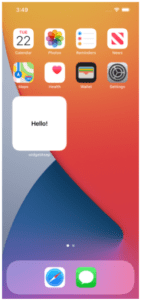
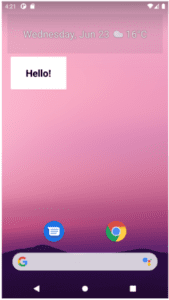
Open the app or the widget itself and you will see something like this:
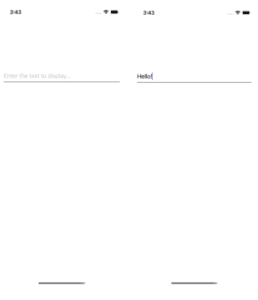
Enter something in the input field, hit the enter key and return to the home screen. Remember we set the refresh time to five minutes so it will take a while to display the text you have just entered. Be patient!
And that’s it for iOS. Let’s see how to achieve the same results on the Android platform.
Android widgets
If you are new to Android widgets, we recommend you take a look at the official Android documentation.
Luckily, This process will be easier than in iOS. The approach will be the same, storing the data we want to display from React Native into the widget and, then, retrieving it using native code (Java, in this case).
Begin by opening the project in Android Studio. We will be using version 4.2.

Then, right click on the res folder and select the option shown above. Name your widget class however you want and click on Finish. We will name it “MyWidget”, like we did for iOS.
A new MyWidget.java file will open. Just as we used UserDefaults for iOS, we will be using the SharedPreferences Android native module.
To do this, you will first need to implement the bridge between the React Native app and the widget. Add the new SharedStorage.java and SharedStoragePackager.java files to the same directory as your MainApplication.java.
SharedStorage.java
Link: script
SharedStoragePackager.java
Link: script
Note that the application package is being imported in the first line of both files. Change the name to your app’s; you can find it in your AndroidManifest.xml file inside android > app > src > main.
Once you have placed those files and made the relevant changes, add this to your MainApplication.java file inside the getPackages method:
packages.add(new SharedStoragePackager());
This will autolink the package we have just created.
Now that we have established the bridge, it’s time to receive that data in MyWidget.java. We need to tell the widget to update its content using SharedPreferences. This is managed by updateAppWidget. Replace your code with this one:
Link: script
The last step is optional and has to do with the widget styling. We will keep the same design as in the iOS example. Using Android Studio, go to your app > res > layout > my_widget.xml file, click on the “Example” text and you will see the following:

To the right, you will see the attributes being used. In this example, changing textStyle, textColor and background is enough.
And that’s it. Try testing it using an Android device, either virtual or real, to confirm you have followed this guide properly.
Find the widget of the application:
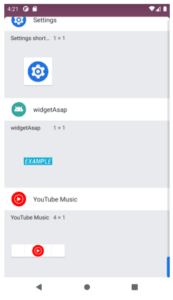
Place it where you want and open the application. Write something in the input field, hit the enter key and return to the home screen.
In this case, the widget has refreshed the content immediately:
Congratulations! You’ve reached the end of this guide for widgets using React Native. You have successfully built a widgets application for the iOS and Android platforms that communicates with a React Native application. We hope this can help you take full advantage of this functionality.
Final thoughts on Widgets for React Native
This simplified application allows you to elevate key content and features from your app so users can see them at a glance. In spite of being combined with a native approach, it wasn’t that difficult to integrate it into a React Native application.
We hope this guide has left you with teachings that you can put into practice for your applications in order to take advantage of the benefits we’ve mentioned, as it could be particularly valuable if your app is part of a business.